
Web : PHP Laravel
Laravel is a PHP based web-framework for building high-end web applications.
Laravel Overview
Laravel is an open-source PHP framework, which is robust and easy to understand. It follows a model-view-controller design pattern. Laravel reuses the existing components of different frameworks which helps in creating a web application. The web application thus designed is more structured and pragmatic.

Laravel offers a rich set of functionalities which incorporates the basic features of PHP frameworks like CodeIgniter, Yii and other programming languages like Ruby on Rails. Laravel has a very rich set of features which will boost the speed of web development.
If you are familiar with Core PHP and Advanced PHP, Laravel will make your task easier. It saves a lot time if you are planning to develop a website from scratch. Moreover, a website built in Laravel is secure and prevents several web attacks.
Advantages of Laravel
Laravel offers you the following advantages, when you are designing a web application based on it −
The web application becomes more scalable, owing to the Laravel framework.
Considerable time is saved in designing the web application, since Laravel reuses the components from other framework in developing web application.
It includes namespaces and interfaces, thus helps to organize and manage resources.
Composer
Composer is a tool which includes all the dependencies and libraries. It allows a user to create a project with respect to the mentioned framework (for example, those used in Laravel installation). Third party libraries can be installed easily with help of composer.
All the dependencies are noted in composer.json file which is placed in the source folder.
Artisan
Command line interface used in Laravel is called Artisan. It includes a set of commands which assists in building a web application. These commands are incorporated from Symphony framework, resulting in add-on features in Laravel 5.1 (latest version of Laravel).
Features of Laravel
Laravel offers the following key features which makes it an ideal choice for designing web applications −
Modularity
Laravel provides 20 built in libraries and modules which helps in enhancement of the application. Every module is integrated with Composer dependency manager which eases updates.
Testability
Laravel includes features and helpers which helps in testing through various test cases. This feature helps in maintaining the code as per the requirements.
Routing
Laravel provides a flexible approach to the user to define routes in the web application. Routing helps to scale the application in a better way and increases its performance.
Configuration Management
A web application designed in Laravel will be running on different environments, which means that there will be a constant change in its configuration. Laravel provides a consistent approach to handle the configuration in an efficient way.
Query Builder and ORM
Laravel incorporates a query builder which helps in querying databases using various simple chain methods. It provides ORM (Object Relational Mapper) and ActiveRecord implementation called Eloquent.
Schema Builder
Schema Builder maintains the database definitions and schema in PHP code. It also maintains a track of changes with respect to database migrations.
Template Engine
Laravel uses the Blade Template engine, a lightweight template language used to design hierarchical blocks and layouts with predefined blocks that include dynamic content.
E-mail
Laravel includes a mail class which helps in sending mail with rich content and attachments from the web application.
Authentication
User authentication is a common feature in web applications. Laravel eases designing authentication as it includes features such as register, forgot password and send password reminders.
Redis
Laravel uses Redis to connect to an existing session and general-purpose cache. Redis interacts with session directly.
Queues
Laravel includes queue services like emailing large number of users or a specified Cron job. These queues help in completing tasks in an easier manner without waiting for the previous task to be completed.
Event and Command Bus
Laravel 5.1 includes Command Bus which helps in executing commands and dispatch events in a simple way. The commands in Laravel act as per the application’s lifecycle.
Get started
PHP having version 7.0 or upper version
An OpenSSL Extension for PHP
A PDO Extension for PHP
Mbstring Extension for PHP
Tokenizer Extension for PHP
XML Extension for PHP
Composer
Laravel implements composer for managing dependencies within it. Hence, before use of Laravel, it needs to check whether you have composer setup on your system or not.
If you don't have composer installed on your computer, first visit this URL to download composer:
https://getcomposer.org/download/
When you are done installing the composer, cross-check whether it is installed or not, by typing in the command prompt the composer command. You can see the Composer screen in that CMD only.
It needs to be kept in mind to put the composer's system-wide vendor in bin directory within your $PATH; as a result, your system can locate the executable of laravel. Depending on which operating system you are using, this directory will exist. Still, for PCs having OS like MAC and Linux, it will be:
Setup Laravel using Installer
First of all, you have to download the installer of Laravel with the help of Composer, like this:
When the installation is done, new command of laravel will start a new fresh installation in that directory you provide.
Create Project
The next thing you have to do is make a new folder in some specific path within your system, for keeping your Laravel projects. Move to that location where the directory is created. For installing the Laravel, the following command you have to type:
The command mentioned above will make Laravel installed on that specific directory. Type the next command:
This above code will start Laravel service. A black screen will appear showing the message: Laravel Development server started on http://localhost:8080
Copy and paste: http://localhost:8080 in your browser, and you can see Laravel home screen appears in your browser.
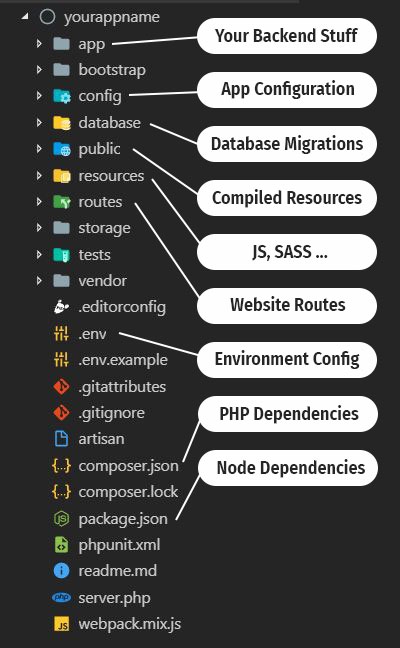
Laravel Project Structure
The top folder, named app is where most of our back-end code will go. We won't go into detail on every single sub directory or file and will concentrate on the ones we'll mostly use, through development of this app.
App
It is the application folder and includes the entire source code of the project. It contains events, exceptions and middleware declaration. The app folder comprises various sub folders as explained below
This is another Laravel directory which holds other subdirectories for additional purposes. These are:
Directory
Description
Console
The Console directory contains all your project artisan commands.
Events
The Events directory hold event files that your laravel application may pop up. Events is used for sending messages or signals to other parts of the laravel project that any action had taken place within the project.
Exceptions
The Exceptions directory holds your laravel project's exception handling files which handles all the exceptions thrown by your Laravel project.
Http
The Http directory holds different filters, requests, and controllers.
Jobs
The Jobs directory holds all lineup jobs in this directory. But it does not get created initially, rather, you need to type and run this artisan command:
Listeners
The Listeners directory holds all your project's handler class for which are used for receiving and handling events.
The Main directory holds all the emails send by through your Laravel project, and this directory needs to be created using the command:
Notifications
The Notifications directory contains all your transactional notifications sent through your Laravel project, and this directory needs to be created using the command:
Policies
The policies directory holds different policies for your laravel project.
Providers
The Providers directory is used for containing different service providers.
Rules
The Rules directory hold all the different objects related to custom validation rules, and this directory needs to be created using the command:
Bootstrap
This folder encloses all the application bootstrap scripts. It contains a sub-folder namely cache, which includes all the files associated for caching a web application. You can also find the file app.php, which initializes the scripts necessary for bootstrap.
Config
The config folder includes various configurations and associated parameters required for the smooth functioning of a Laravel application. Various files included within the config folder are as shown in the image here. The filenames work as per the functionality associated with them.
Database
As the name suggests, this directory includes various parameters for database functionalities. It includes three sub-directories as given below −
Seeds − This contains the classes used for unit testing database.
Migrations − This folder helps in queries for migrating the database used in the web application.
Factories − This folder is used to generate large number of data records.
Public
It is the root folder which helps in initializing the Laravel application. It includes the following files and folders −
.htaccess − This file gives the server configuration.
javascript and css − These files are considered as assets.
index.php − This file is required for the initialization of a web application.
Resources
Resources directory contains the files which enhances your web application. The sub-folders included in this directory and their purpose is explained below −
assets − The assets folder include files such as LESS and SCSS, that are required for styling the web application.
lang − This folder includes configuration for localization or internalization.
views − Views are the HTML files or templates which interact with end users and play a primary role in MVC architecture.
Observe that the resources directory will be flattened instead of having an assets folder. The pictorial representation of same is shown below −

Storage
This is the folder that stores all the logs and necessary files which are needed frequently when a Laravel project is running. The sub-folders included in this directory and their purpose is given below −
app − This folder contains the files that are called in succession.
framework − It contains sessions, cache and views which are called frequently.
Logs − All exceptions and error logs are tracked in this sub folder.
Tests
All the unit test cases are included in this directory. The naming convention for naming test case classes is camel_case and follows the convention as per the functionality of the class.
Vendor
Laravel is completely based on Composer dependencies, for example to install Laravel setup or to include third party libraries, etc. The Vendor folder includes all the composer dependencies.
Request Life Cycle of Laravel
Auto Loader
As a first step, the request will be triggered from the user’s browser, then it will reach web server. Web server (Apache or Nginx) will redirect the given request to Laravel public/index.php file which is simply a starting point for loading the rest of the framework. It loads the auto loader files which is generated by composer.
Then it retrieves an instance of the Laravel application from bootstrap/app.php script. Laravel itself creates an instance of the application, is the initial/first step.
Kernel
Next step will occur on the Kernel part of the application.
The incoming request is sent to either the HTTP kernel or the console kernel, depending on the type of request that is entering the application .These two kernels serve as the central location that all requests flow through.
HTTP kernel, which is placed in app/Http/Kernel.php. It just receive a Request and return a Response. Bootstrappers that are defined by the Kernel class, which configures error handling, configure logging, detect environments and other tasks to be done before the request handled.
HTTP Kernel will define the list of middleware that are passed through before handled by application.
Service Providers
Next step of the kernel is to load service providers as part of the bootstrapping action. Providers that are needed for the application are placed in config/app.php configuration file.
While the register method calls, all the providers will be registered. Once all providers are registered, then boot method will be called.
Dispatch Request
Once the application have been bootstrapped and all service providers are registered and booted, the request will be handed over to the router for dispatching. The router will dispatch the request to a route or controller, as well as run any route specific middleware.
Router:
Now request will be dispatched by the Router and it will end up with the views as shown below:
Router will direct the HTTP Request to a Controller or return a view or responses directly by omitting the controller. These routes will be placed in app/routes.php.
Controller app/controllers/ performs specific actions and sends data to a View.
View app/views/ formats the data appropriately, providing the HTTP Response.
The above steps are clearly explained in the diagrammatical view below.

Let’s see an example for a request
Step 1
The user input http://xyz.com in the browser and hits ‘enter’.
Step 2
Once the user hit this URL, the browser will send the page request over the Internet to the web server.
Step 3
Web server will receive the request and analyze the request information. In web server’s configuration file, site’s root path is specified. Based on that, web server will look for index.php file in that root directory, since URL doesn’t contain any sub directory or any other routes.
Step 4
Web server will direct the request to public/index.php file of laravel application.
Step 5
In this step, PHP Interpreter is executing the code contained in the index.php file from the request. During this step, auto loader files which are generated by composer will be loaded.
Step 6
Then it will create the laravel instance and bootstrapping the components of laravel.
Step 7
The kernel will receive the request, load the service providers and will be redirected to router.
Step 8
Router will render the view file content and return back to web server.
Step 9
Web server receives the output from PHP and sends it back over the Internet to a user’s web browser.
Step 10
The user’s web browser receives the response from the server, and renders the web page on user’s computer.
Configuring in Laravel Project
Configuring the Basic in Laravel Project
If you are new to Laravel, then you should know that you have the provision to create configuration files for Laravel application. After installing Laravel, you need to perform the permission writing for your storage directory along with the bootstrap/cache.
Next, you have to do is, generating the application key for session securing and encrypted data keys also. In case, the root directory doesn't have the .env file, in that case, you will have to rename the file .env.example to .env and run the command mentioned below where you've installed the Laravel:
You can see in the .env file the newly generated key. Moreover, it is also possible to configure time zone as well as a locale in the config/app.php file of your project.
Configuring the Environment
By default, the .env file includes following parameters −
Important Points
While working with basic configuration files of Laravel, the following points are to be noted −
The .env file should not be committed to the application source control, since each developer or user has some predefined environment configuration for the web application.
For backup options, the development team should include the .env.example file, which should contain the default configuration.
Configuring the Database
You can configure the database for your application using the config/database.php file of your project. Setting the configuration constraint utilized by various databases can also be done, and moreover, Laravel also allowed us to use the default one as well.
Maintenance Modes
Websites are regularly modified. As s a developer for this, you have to put your site in maintenance mode. In this advanced framework, it becomes easier to do that by using two artisan commands. Let's see how to use the commands:
For starting your project maintenance approach, the following command is required:
After changing the required stuff, when it is time to re-run your project, the following command is required:
Last updated