
UI : Angular 8
open-source, client-side TypeScript based JavaScript framework
Angular Overview
Angular is a framework for building client applications in HTML and JavaScript or language like Typescript that compiles to JavaScript. This platform develop’s application across web, desktop and mobile application. The framework is developed by developers at Google and is being used by developers across the globe.

Angular is used to build single page applications unlike the typical web application where on a click you need to wait for the page to re-load. This give you experience of a desktop or mobile app where part of the page will refresh asynchronously without refreshing the entire application.

During page redirects many sections of the page like header/footer and some functionality remains unchanged and hence instead of reloading everything Angular helps to load changed content dynamically, this increases the speed and performance of the application. Angular helps to achieve this.
Why Angular ?
Performance Faster initial Load, change detection and great rendering time.
Component based Development: In Angular 8 everything is component and this is the term you will hear and work the most. They are the building block of Angular application. So you get greater code reuse and the code is unit testable.
Client Side Templating: Using templates in the browser is becoming more and more widespread. Moving application logic from the server to the client, and the increasing usage of MVC-like patterns (model–view–controller) inspired templates to embrace the browser. This used to be a server-side only affair, but templates are actually very powerful and expressive in client-side development as well.
Mobile Support: (Cross Platform Support) With angular you can create SPA apps that work on web and great on mobile.
Getting Started with Angular
From the terminal, install the Angular CLI globally with:
This will install the command ng into your system, which is the command you use to create new workspaces, new projects, serve your application during development, or produce builds that can be shared or distributed.
Create a new Angular CLI workspace using the ng new command:
From there you replace the /src folder with the one from your StackBlitz download, and then perform a build.
Angular 8 Architecture
The basic building blocks of an Angular application are NgModules, which provide a compilation context for components. NgModules collect related code into functional sets; an Angular app is defined by a set of NgModules. An app always has at least a root module that enables bootstrapping, and typically has many more feature modules.
Components define views, which are sets of screen elements that Angular can choose among and modify according to your program logic and data.
Components use services, which provide specific functionality not directly related to views. Service providers can be injected into components as dependencies, making your code modular, reusable, and efficient.
Key parts of Angular 8 Architecture:

Angular 8 Components
In Angular 8, Components and services both are simply classes with decorators that mark their types and provide metadata which guide Angular to do things.
Every Angular application always has at least one component known as root component that connects a page hierarchy with page DOM. Each component defines a class that contains application data and logic, and is associated with an HTML template that defines a view to be displayed in a target environment.
Metadata of Component class
The metadata for a component class associates it with a template that defines a view. A template combines ordinary HTML with Angular directives and binding markup that allow Angular to modify the HTML before rendering it for display.
The metadata for a service class provides the information Angular needs to make it available to components through dependency injection (DI).

MODULE
Angular bring the concept of Modularity, where you can make a single application by separating into many modules.
A module is a mechanism to group components, directives and services that are related, in such a way that can be combined with other modules to create an application
You can think of Modules as Boxes where you separate and organize application functionality into features and reusable chunks. You can think of them much like packages and namespaces of Java AND C#.
TEMPLATES
Now each Component has a HTML Templates which is the View that displays the information on the browser. So template looks like regular HTML but we just sprinkle Angular syntax’s and custom components on the page. You use interpolation to weave calculated strings into the text between HTML element tags and within attribute assignments. Structural directives are responsible for HTML layout.

There are two types of data binding:
1. Event Binding: Event binding is used to bind events to your app and respond to user input in the target environment by updating your application data.
2. Property Binding: Property binding is used to pass data from component class and facilitates you to interpolate values that are computed from your application data into the HTML.
DIRECTIVE
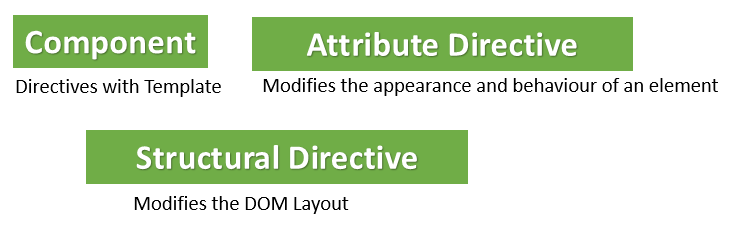
Angular templates are dynamic. When Angular renders them, it transforms the DOM according to the instructions given by directives. Angular ships with built-in directives and you can write your own directives. A directive is a class with a @Directive decorator. A component is a directive-with-a-template; a @Component decorator is actually a @Directive decorator extended with template-oriented features. There are other built-in directives, classified as either attribute directives or structural directives and they are used to modify the behavior and structure of other HTML elements.
DATA BINDING
Now if you have worked on Jquery and JavaScript then you must know the pain to push data values into HTML Controls and then tracking user response and actions. We always have errors to bind and understanding the binding was always difficult. Angular Supports Data Binding which is kind of a connection between View and application data values (Business Logic). This Data Binding make the application simple to read, write and maintain as these operation are maintained by binding framework. Based on the flow of data, you may have three kinds of data Binding also you may have different ways (or more than one way to achieve) the same.
View to Source (HTML Template to Component) : Event Binding ()
Source to View (Component to HTML Template) : Property Binding / Interpolation []
Two way (View to Source & Source to view) : Banana in a Box [()]
Services
Let’s see a scenario we developed a component and this component became famous so many people may ask for it. Or another scenario may be that your project require a piece of code to be used in many places. For these kind of scenarios we can create a service which bring re-usability and reduce the overhead required to develop debug and test the duplicate code in multiple place instead of having that in a single place.

Angular 8 Project Structure

src Folder
This is where the actual action happen, where we keep our source code like component, modules, templates, services, directives, images etc. Things we will look here:-
app Folder
environments Folder
Index.html
Main.ts & Polyfills.ts
app Folder
The sub-folder /app/ under /src/ contain our modules and component. Every angular application comes up with at-least one module and component.
Module groups component which are dedicated for the functioning of an application. The module file is named as app.module.ts and there is at-least one module inside an angular application.
While the component defines the view (things you see on browser) and the application logic. A module can have lots of component.

To see how the call of files happen inside the angular folder structure, please refer the above diagram. It all start with the 1) Main.ts the entry point from which 2) app.Module.ts gets called which in turns call a particular 3) App.component.ts file. Under /src/ folder we have other files and folders as shown in the above image
a) assets : Store’s all the static files like Images and icons etc. used within your application b) favicon.ico : The icon for your App c) style.css : Global CSS and stylesheet which can be used by all your pages and components d) test.ts : Configuration used for setting the testing environment
environments Folder
The sub-folder /environments/ under /src/ contain 2 files each for different environment and they are used to store configuration information like database credential, server address, or some property that differs across those environments
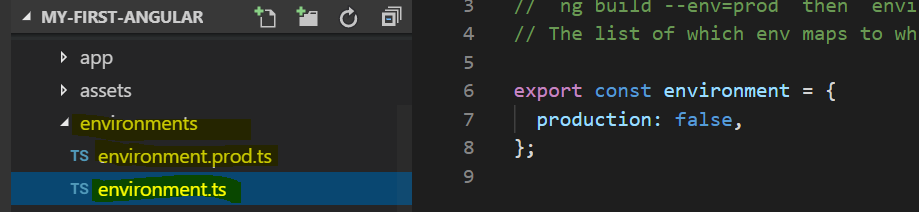
1) environment.ts: This environment file is used by default and is used during the development. If you open this file you will notice that production property is set to false. 2) environment.prod.ts: It is used during the production build, this is called when you build your application with ng build –env=prod .
Index.html
This is the file called by the user. A plain html file which contains your angular directive (e.g. <app-root></app-root>) which calls the angular component. Also when you open the file you don’t see any referenceto CSS as those are injected during the build process.

Main.ts & Polyfills.ts
Main.ts :- This is the starting point of the app. It is here your application get compiled with Just In Time compiler and then it bootstraps or load the Module called AppModule which is the root module of the application. Every angular application has at-least one Angular Module called the root module which is called the AppModule.

Polyfills.ts :- Angular is built on the latest standards of the web platform which target a wide range of browsers and this becomes challenging to ensure things do not break in the old browsers. Polyfills are workaround scripts that ensure that your recent codes (which use the new browser features) do not break in the old browsers (which do not support the new browser features).
Angular.json
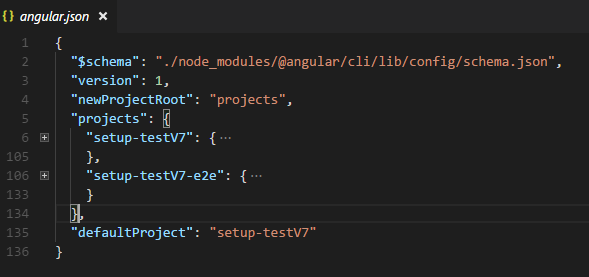
Angular.json at the root level of an Angular workspace provides workspace-wide and project-specific configuration defaults for build and development tools provided by the Angular CLI. This file also defines settings and configuration for various features and files and help set naming conventions, pointing to correct files in the solution and also changing settings during the project build. With Angular 6 and later we have the workspace concept where collection of angular projects can co-locate where few properties configure the workspace. Then there is a project section where you will have per project individual configuration.
Main properties that we find in the angular.json file that configure workspace and projects properties are –
$schema: used by Angular CLI in order to enforce the specification of Angular workspace schema , this $schema property refers to angular CLI implementation file.
Version: The configuration-file version.
newProjectRoot: Path where new projects are created.
projects: Contain a subsection for each project (library or application) in the workspace.
defaultProject: When you use ng new to create a new app in a new workspace, this app gets creates as a default project in the workspace.
Package.json

This contain list of packages required to build and run our angular application. There are two lists of such packages called dependencies and dev dependencies. dependencies: Normal project dependency which are both required during runtime and development. You can think of them as a reference to mandatory modules. devDependencies : These modules are only required during the development and they don’t get called actual project release or runtime. This file also contains some basic information about project like (name, description, license etc). The interesting part here is the scripts section which takes Key/Value as input. Each one of the keys in these key/value pairs is the name of a command that can be run and the corresponding value of each key is the actual command that is run.
tsconfig.json
Typescript is the primary language for Angular application but the problem is that browsers don’t understand this language, so the typescript must be transpiled into the Javascript. Hence this file defines the compiler option required to compile the project
Angular 8 Lazy Loading
Angular announced a new version 8.0 and its improved few methods and the compiler to reduce the bundle size 40% less. Now time to update my previous article Angular Routing with Lazy loading Design Pattern.

Angular Test
Unit Testing
This is sometimes also called Isolated testing. It’s the practice of testing small isolated pieces of code. If your test uses some external resource, like the network or a database, it’s not a unit test.Functional Testing
This is defined as the testing of the complete functionality of an application. In practice with web apps, this means interacting with your application as it’s running in a browser just like a user would interact with it in real life, i.e. via clicks on a page.
This is also called End To End or E2E testing.
Jasmine
Jasmine is a javascript testing framework that supports a software development practice called Behaviour Driven Development, or BDD for short. It’s a specific flavour of Test Driven Development (TDD).
Jasmine, and BDD in general, attempts to describe tests in a human readable format so that non-technical people can understand what is being tested. However even if you are technical reading tests in BDD format makes it a lot easier to understand what’s going on.
For example if we wanted to test this function:TypeScript
We would write a jasmine test spec like so:TypeScript
One
The describe(string, function) function defines what we call a Test Suite, a collection of individual Test Specs.
Two
The it(string, function) function defines an individual Test Spec, this contains one or more Test Expectations.
Three
The expect(actual) expression is what we call an Expectation. In conjunction with a Matcher it describes an expected piece of behaviour in the application.
Four
The matcher(expected) expression is what we call a Matcher. It does a boolean comparison with the expected value passed in vs. the actual value passed to the expect function, if they are false the spec fails.
Built-in matchers
Jasmine comes with a few pre-built matchers like so:TypeScript
You can see concrete examples of how these matchers are used by looking at the Jasmine docs here: http://jasmine.github.io/edge/introduction.html#section-Included_Matchers
Setup and teardown
Sometimes in order to test a feature we need to perform some setup, perhaps it’s creating some test objects. Also we may need to perform some cleanup activities after we have finished testing, perhaps we need to delete some files from the hard drive.
These activities are called setup and teardown (for cleaning up) and Jasmine has a few functions we can use to make this easier:beforeAll
This function is called once, before all the specs in describe test suite are run.afterAll
This function is called once after all the specs in a test suite are finished.beforeEach
This function is called before each test specification, it function, has been run.afterEach
This function is called after each test specification has been run.
We might use these functions like so:TypeScript
Running Jasmine Test
To manually run Jasmine tests we would create a HTML file and include the required jasmine javascript and css files like so:HTML
We then load in the parts of our application code that we want to test, for example if our hello world function was in main.js:HTML
Important : The order of script tags is important.
We then would load each individual test suite file, for example if we placed our test suite code above in a file called test.js we would load it in like so:HTML
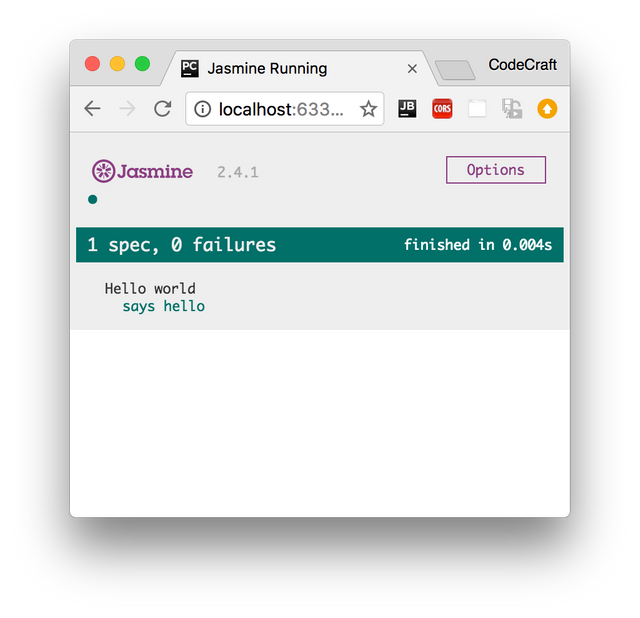
To run the tests we simply open up the HTML file in a browser.
Once all the files requested via script and link are loaded by a browser the function window.onload is called, this is when Jasmine actually runs the tests.
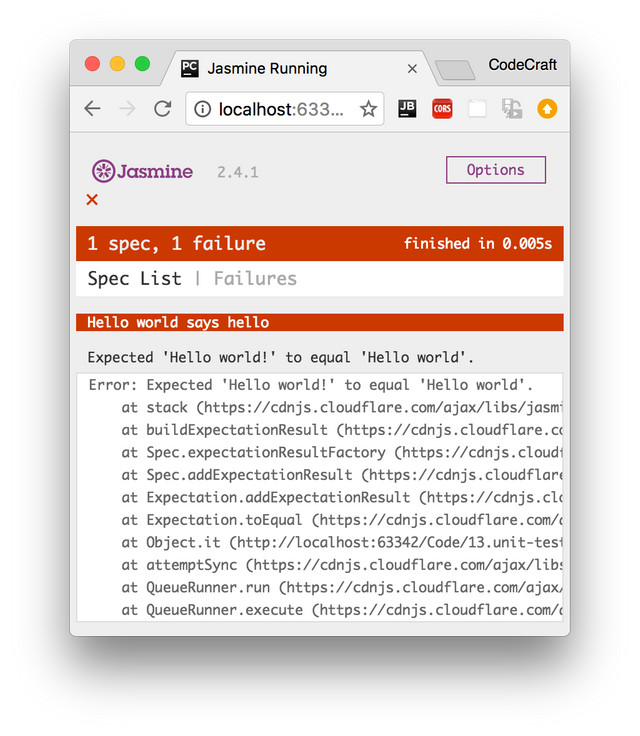
The results are displayed in the browser window, a failing run looks like:
A passing run looks like:
If we wanted to test our code in different browsers we simply load up the HTML file in the browser we want to test in.
If we wanted to debug the code we would use the developer tools available to us in that browser.
Karma
Manually running Jasmine tests by refreshing a browser tab repeatedly in different browsers every-time we edit some code can become tiresome.
Karma is a tool which lets us spawn browsers and run jasmine tests inside of them all from the command line. The results of the tests are also displayed on the command line.
Karma can also watch your development files for changes and re-run the tests automatically.
Karma lets us run jasmine tests as part of a development tool chain which requires tests to be runnable and results inspectable via the command line.
It’s not necessary to know the internals of how Karma works. When using the Angular CLI it handles the configuration for us and for the rest of this section we are going to run the tests using only Jasmine.
Dashboard ngx-admin
ngx-admin is a front-end admin dashboard template based on Angular 8+, Bootstrap 4+ and Nebular. That means all the data you can see on graphs, charts and tables is mocked in Javascript so you can use the backend of your choice with no limitations.

List of features
Angular 8+ & Typescript
Bootstrap 4+ & SCSS
Responsive layout
RTL support
High resolution
Flexibly configurable themes with hot-reload (3 themes included)
Authentication module with multiple providers
Lots of awesome features:
Buttons
Modals
Popovers
Icons
Typography
Animated searches
Forms
Tabs
Notifications
Tables
Maps
Charts
Editors
Theme System
Nebular Theme System is a set of rules we put into how SCSS files and variables are organized to achieve the following goals:
ability to flexibly change looks & feel of the application by managing variables, without changing SCSS itself;
ability to switch between visual themes in a runtime without reloading the page;
support of CSS-variables (implemented partially).
Theme Map
Each theme is represented as an SCSS map with a list of key-value pairs:
Where key - is a variable name, and value - is a raw SCSS value (color, string, etc) or parent variable name, so that you can inherit values from different variables:
Here font-secondary inherits its value from font-main.
Component Variables
Then, for each component of the Nebular Components, there is a list of variables you can change. For example - header component variables:
As you can see, you have 8 variables for a pretty simple component and from the other side, 6 of them are inherited from the default values. It means that if you want to create a new theme with a united look & feel of the components - in most cases you would need to change around 10 generic variables, such as color-bg, shadow, etc. to change the UI completely.
List of component style variables is specified in the component documentation, for example styles for header component.
Variables Usage
Now, if you want to use the variables in your custom style files, all you need to do (of course, after the successful setup of the Theme System is to call nb-theme(var-name) function:
Depending on the currently enabled theme and the way card-bg inherited in your theme, you will get the right color.
Built-in themes
Currently, there are 3 built-in themes:
default- clean white themecosmic- dark themecorporate- firm business theme
Themes can also be inherited from each other, cosmic, for instance, is inherited from the default theme.
Magic of multiple themes with hot-reload
As you can see from the ngx-admin emo, you can switch themes in the runtime without reloading the page. It is useful when you have multiple visual themes per user role or want to provide your user with such a configuration so that he can decide which theme works best for him. The only requirement for the feature to work is to wrap all of your component styles into special mixin nb-install-component and use nb-theme to get the right value:
Backend Integration
This section describes approaches of integration of ngx-admin application with backend API. Despite we understand that every backend is really different, we think that we can cover several most commonly used ways.
Integration with JSON REST server
Despite there's an option to do CORS requests to API server directly, we don't advise to do so. This way has disadvantages in terms of security and performance. In terms of security when you do CORS request you basically expose your API server URL to everybody. Your API server should take additional measures to make sure some URLs are not accessible, because it is exposed to the web. As for performance, CORS requests require to send preflight OPTIONS request before each HTTP request. This adds additional HTTP overhead.
The solution we suggest is to use proxy for your API server. In this case you can make your app accessible through some sub-url. For example, if your application's hosted under url website.com and your index file is located at website.com/index.html, you can make your API root accessible on website.com/api. This is well supported by angular-cli/webpack-dev-server for development setup and by web servers for production setup. Let's review these setups:
angular-cli/webpack-dev-server setup
There's not so much needs to be done to proxy your api using angular-cli. You can read detailed documentation in their docs. But the most important topics are:
You should create proxy.conf.json file in your application root. The file should contain something like below:
In this case you should put URL of your API server instead of http://localhost:3000.
After that you need to run your angular-cli application using following command
That's it. Now you can access /api URL from your ngx-admin application and your requests will be forwarded to your API server.
Production setup
Production setup is not much different from development setup. The only difference is that usually you don't use there angular-cli or webpack-dev-server to host your HTML/CSS/JS. Usually we all use some web server for that. At Akveo we mostly use nginx for this use case. Below there is a sample configuration for this particular web server. For others it is not that much different.
Usually you create new virtual host with some similar configuration:
The only thing you need to add is proxy-pass to /api URL like below:
That's it. Now your API server works on production as well.
Last updated